Prepros is a good software to deal with your generic construct duties like compiling Sass, course of photographs, and bundle JavaScript.

At present, we are able to use the seventh model of it, which has extra data than ever earlier than. I like to make use of this small software to simplify my improvement course of. It’s essential to know that for a complicated construct process, you all the time want Gulp, Webpack, or another software, however for lots of job, it’s greater than sufficient.
A helpful newer characteristic is JS bundling and npm dealing with. Though I’ve been utilizing it for some time, I nonetheless discover new (for me) performance just like the customized instruments that assist us to run customized instructions (like an npm command).
A customized command is your personal software, which isn’t supported by Prepos, however you continue to wish to run it (something you possibly can run in your command line). It is sort of a plus layer that runs in your construct stream, like a hook.
Sadly, the custom command documentation isn’t the very best, however if you’re accustomed to your command immediate and npm, you’re going to get it.
The one information that you’ll find on the official documentation web page is concerning the placeholders. Utilizing placeholders, we are able to customise our instructions with replaceable sections which are wanted for any command.
{{enter}} — Quoted path of the enter file.
{{rawInput}} — Unquoted path of the enter file.
{{output}} — Quoted path of the output file.
{{rawOutput}} — Unquoted path of the output file.
{{inputDir}} — Quoted folder of the enter file.
{{rawInputDir}} — Unquoted folder of the enter file.
{{outputDir}} — Quoted folder of the output file.
{{rawOutputDir}} — Unquoted folder of the output file.
{{rootDir}} — Quoted path of the venture folder.
{{rawRootDir}} — Unquoted path of the venture folder.
However what customized command do we want? For me, it was PurgeCSS. Utilizing PureCSS, we are able to take away some pointless bloat from our CSS that’s typically required once we pull extra vital belongings into our tasks (just like the Bootstrap grid).
You should use any software that’s accessible by way of CLI, however on this article, I’ll present you the PurgeCSS setup.
First, you must set up it to your system globally by way of npm with the next command:
npm i -g purgecss
With the purgecss –assist command, you possibly can see the accessible flags, however studying by way of the whole documentation may nonetheless be helpful. We are able to additionally configure the CLI with a standalone file (purgecss.config.js) that simplifies the job.
Subsequent, create a file at your venture root named purgecss.config.js, the place we’ll place our config.
module.exports = {
content material: ['**/*.php', '*.php', 'assets/scss/**/*.scss'],
safelist: [
/^rtl(-.*)?$/,
/^home(-.*)?$/,
/^blog(-.*)?$/,
/^archive(-.*)?$/,
/^date(-.*)?$/,
/^error404(-.*)?$/,
/^logged-in(-.*)?$/,
/^admin-bar(-.*)?$/,
/^no-customize-support(-.*)?$/,
/^wp-custom-logo(-.*)?$/,
/^search(-.*)?$/,
/^nav(-.*)?$/,
/^wp(-.*)?$/,
/^screen(-.*)?$/,
/^navigation(-.*)?$/,
/^(.*)-template(-.*)?$/,
/^(.*)?-?single(-.*)?$/,
/^postid-(.*)?$/,
/^post-(.*)?$/,
/^attachmentid-(.*)?$/,
/^attachment(-.*)?$/,
/^page(-.*)?$/,
/^(post-type-)?archive(-.*)?$/,
/^author(-.*)?$/,
/^gallery(-.*)?$/,
/^category(-.*)?$/,
/^tag(-.*)?$/,
/^card(-.*)?$/,
/^menu(-.*)?$/,
/^tags(-.*)?$/,
/^tax-(.*)?$/,
/^term-(.*)?$/,
/^date-(.*)?$/,
/^(.*)?-?paged(-.*)?$/,
/^says(-.*)?$/,
/^depth(-.*)?$/,
/^comment(-.*)?$/,
/^comments(-.*)?$/,
/^children(-.*)?$/,
/^crnb(-.*)?$/,
/^custom(-.*)?$/,
/^custom-background(-.*)?$/,
/^port-description(-.*)?$/,
'separator',
'generic-form',
'is-visible',
'aria-current',
'google-map',
'pre'
]
}
You possibly can see we arrange the supply recordsdata (content material property) and the whitelist (with patterns too). The patterns are for usually for WordPress as a result of it was used for a WP venture.
Add PurgeCSS customized command in Prepros.
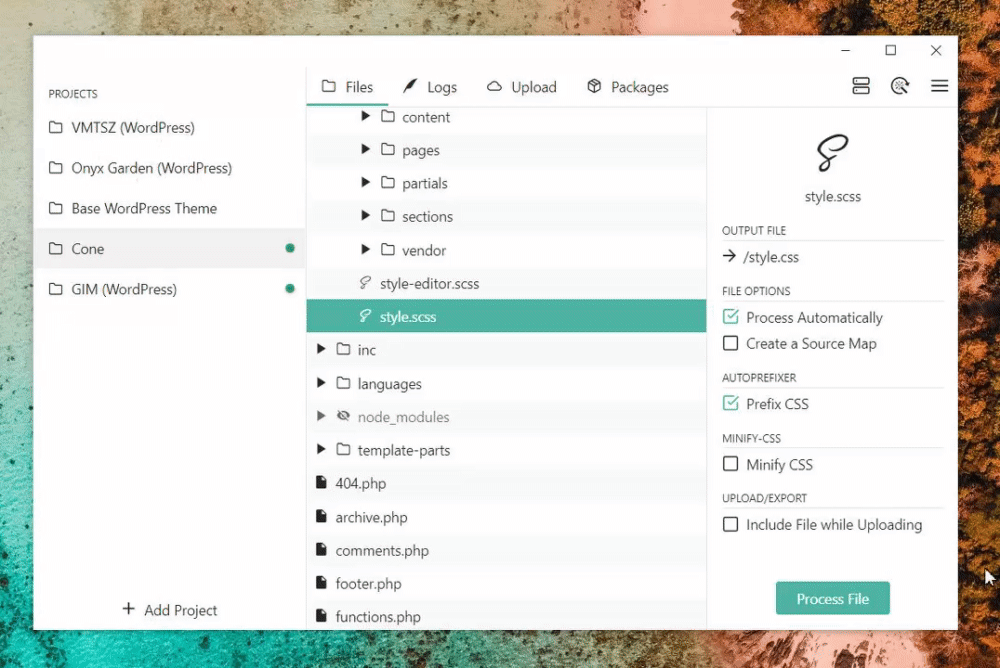
The final step is so as to add the customized process to our Sass construct course of. For this open, the “Undertaking Settings”, navigate to the “CSS Instruments” menu and choose “Sass” from the record. Right here scroll right down to the duties and click on on the “Add Customized Command”. The command is the next:
purgecss --css {{enter}} --output {{output}} --config ./purgecss.config.js
You see why we want the placeholders right here; in any other case, our command gained’t know the place to seek out our file and output root. Right here we additionally set the config file’s origin.
As you see, you possibly can activate and off the command with the checkbox earlier than the command area or within the associated sidebar.

Activate and off your customized command.
I used to be stunned that I may do this type of process with Prepros. I hope it could actually show you how to as a result of in lots of instances I can’t suggest this helpful app sufficient.
At present, we are able to use the seventh model of it, which has extra data than ever earlier than. I like to make use of this small software to simplify my improvement course of. It’s essential to know that for a complicated construct process, you all the time want Gulp, Webpack, or another software, however for lots of job, it’s greater than sufficient.
A helpful newer characteristic is JS bundling and npm dealing with. Though I’ve been utilizing it for some time, I nonetheless discover new (for me) performance just like the customized instruments that assist us to run customized instructions (like an npm command).
What’s a Customized Command?
A customized command is your personal software, which isn’t supported by Prepos, however you continue to wish to run it (something you possibly can run in your command line). It is sort of a plus layer that runs in your construct stream, like a hook.
The right way to Use a Customized Software?
Sadly, the custom command documentation isn’t the very best, however if you’re accustomed to your command immediate and npm, you’re going to get it.
The one information that you’ll find on the official documentation web page is concerning the placeholders. Utilizing placeholders, we are able to customise our instructions with replaceable sections which are wanted for any command.
{{enter}} — Quoted path of the enter file.
{{rawInput}} — Unquoted path of the enter file.
{{output}} — Quoted path of the output file.
{{rawOutput}} — Unquoted path of the output file.
{{inputDir}} — Quoted folder of the enter file.
{{rawInputDir}} — Unquoted folder of the enter file.
{{outputDir}} — Quoted folder of the output file.
{{rawOutputDir}} — Unquoted folder of the output file.
{{rootDir}} — Quoted path of the venture folder.
{{rawRootDir}} — Unquoted path of the venture folder.
However what customized command do we want? For me, it was PurgeCSS. Utilizing PureCSS, we are able to take away some pointless bloat from our CSS that’s typically required once we pull extra vital belongings into our tasks (just like the Bootstrap grid).
Use PurgeCSS with Prepros
You should use any software that’s accessible by way of CLI, however on this article, I’ll present you the PurgeCSS setup.
First, you must set up it to your system globally by way of npm with the next command:
npm i -g purgecss
With the purgecss –assist command, you possibly can see the accessible flags, however studying by way of the whole documentation may nonetheless be helpful. We are able to additionally configure the CLI with a standalone file (purgecss.config.js) that simplifies the job.
Subsequent, create a file at your venture root named purgecss.config.js, the place we’ll place our config.
module.exports = {
content material: ['**/*.php', '*.php', 'assets/scss/**/*.scss'],
safelist: [
/^rtl(-.*)?$/,
/^home(-.*)?$/,
/^blog(-.*)?$/,
/^archive(-.*)?$/,
/^date(-.*)?$/,
/^error404(-.*)?$/,
/^logged-in(-.*)?$/,
/^admin-bar(-.*)?$/,
/^no-customize-support(-.*)?$/,
/^wp-custom-logo(-.*)?$/,
/^search(-.*)?$/,
/^nav(-.*)?$/,
/^wp(-.*)?$/,
/^screen(-.*)?$/,
/^navigation(-.*)?$/,
/^(.*)-template(-.*)?$/,
/^(.*)?-?single(-.*)?$/,
/^postid-(.*)?$/,
/^post-(.*)?$/,
/^attachmentid-(.*)?$/,
/^attachment(-.*)?$/,
/^page(-.*)?$/,
/^(post-type-)?archive(-.*)?$/,
/^author(-.*)?$/,
/^gallery(-.*)?$/,
/^category(-.*)?$/,
/^tag(-.*)?$/,
/^card(-.*)?$/,
/^menu(-.*)?$/,
/^tags(-.*)?$/,
/^tax-(.*)?$/,
/^term-(.*)?$/,
/^date-(.*)?$/,
/^(.*)?-?paged(-.*)?$/,
/^says(-.*)?$/,
/^depth(-.*)?$/,
/^comment(-.*)?$/,
/^comments(-.*)?$/,
/^children(-.*)?$/,
/^crnb(-.*)?$/,
/^custom(-.*)?$/,
/^custom-background(-.*)?$/,
/^port-description(-.*)?$/,
'separator',
'generic-form',
'is-visible',
'aria-current',
'google-map',
'pre'
]
}
You possibly can see we arrange the supply recordsdata (content material property) and the whitelist (with patterns too). The patterns are for usually for WordPress as a result of it was used for a WP venture.
Add PurgeCSS customized command in Prepros.
The final step is so as to add the customized process to our Sass construct course of. For this open, the “Undertaking Settings”, navigate to the “CSS Instruments” menu and choose “Sass” from the record. Right here scroll right down to the duties and click on on the “Add Customized Command”. The command is the next:
purgecss --css {{enter}} --output {{output}} --config ./purgecss.config.js
You see why we want the placeholders right here; in any other case, our command gained’t know the place to seek out our file and output root. Right here we additionally set the config file’s origin.
As you see, you possibly can activate and off the command with the checkbox earlier than the command area or within the associated sidebar.
Activate and off your customized command.
Abstract
I used to be stunned that I may do this type of process with Prepros. I hope it could actually show you how to as a result of in lots of instances I can’t suggest this helpful app sufficient.